Pages

Friday, March 31, 2017

Mini Weaving from my Mini Loom

Hello.

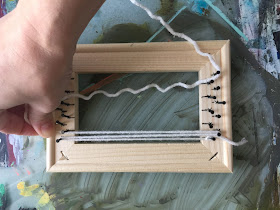
So I shared and built a DIY Mini Loom. Very easy little project that is portable and you can weave on the go!

I decided to try it out tonight and I must say the size is conducive for quick works. However, I think fringe should be eliminated on such small works and you can focus on stitching.


Very easy to start, watch a few episodes of your fav show on Hulu and be on your merry weaving way!


Just remember.... when the yarn strays, the cat will play. ;)


Two episodes of The Voice later and I was done with this cute little addition to a baby girls room :)


Enjoy!

xoxo
Ginger

I will be linking to these awesome parties!


Thursday, March 30, 2017

DIY Artist Mat with Poster Board

Hello.

Just wanting to connect with the artists out there! I'm a mixed media artist myself and have participated in many group shows as well as had several solo shows. Here are some little paintings I completed while art journaling.


And all that work needs to be presented perfectly - hence a chic white artist mat to frame artwork. I prefer white as it makes every other color pop against it. It is a also a very classic look ;) With all this art work, I am a big fan of pre-cut mats. I generally order them from Amazon with the backer and plastic sleeve - very economical and easy!

However, they come in very common sizes and art isn't always a common size. So for little paintings on paper, I generally do a quick art mat from poster board with a card board backer. Really easy and every thing you need can be found at the Dollar Tree.

Here is what you'll need:

card board (preferably white)
white poster board sheets
ruler
utility knife
masking tape
paper cutter (or scissors)
pencil


Quick tip: I bought the package of 5 white poster board sheets as well as the white card board at the Dollar Tree in the school supply section.

First, I placed my art on the cardboard piece and gauged how large I wanted my final matted piece. I then measured 2 inches in. I then measured two inches from all sides.


Then cut the card board square and this will be our backer board.


Then lay the backer on the poster board and trace the edge.


Using the paper cutter or scissors, cut the poster board to size.


Now you have two matching sized pieces.


Set aside the backer and lets focus on the mat. Using your art as a guide, measure where the window will go.


I chose 2 1/4 inches in on all sides. Using the utility knife, carefully cut out the window.


Then using the masking tape, attach the art into the window of the mat.


Sandwich the matted art and backer together and frame. 
Or use plastic art sleeves or bags, as I have done here.


All done!
Enjoy!

xoxo
Ginger

I will be linking to these awesome parties!

Wednesday, March 29, 2017

Build Your Own Mini Loom

Hello.

So weaving has become one of my new favorites crafts to do. It is so easy and relaxing! Just put in your ear buds and go to town :)

I decided to make my own mini loom to take with me while traveling. After all, I crochet on the plane, why not weave? It's so simple, I know you all can build one and before you know it, you'll be weaving like crazy.


Here is what you need to get started:


5 x 7 inch stretched canvas
hammer
nails
yarn
pen and scissors (not pictured)

Lets talk about the nails quickly. You will need nails with a flat head. Finishing nails are not a good idea. At least 1 inch long is preferred.


Turn your canvas over and you'll see how it is stretched and stapled in the back. 


Start by ripping the canvas off the canvas frame. You could use a flat head screw driver or pliers to take the staples out but it's pretty easy to just rip it.


Then you are left with a perfect wooden frame. You could build your own frame for custom or large scale looms, but this works great for now ;)


Then, using your ruler, measure 1/4 inch from the inside of the frame. Make a mark using the pen.


From that 1/4 inch pen mark, then mark every 1/2 inches.


From each pen mark, draw a line down at 1/4 length.


Then, starting from the end line, measure 1/4 inch in and mark with the pen. You'll then mark every 1/2 inch as before and draw a 1/4 length line as before.

You will now have warp points staggered at every quarter inch. I like to mark the ends of the lines with X's as that is where we will hammer the nails in.


Like this. The nails do not have to be straight or perfect; you mainly want the point of the nail dead on your X for an evenly space warp thread.


We'll then start warping the loom. Tie the yarn at one end nail in a tight double knot. I just used plain white yarn here as the warp threads don't show very much.


Then begin warping the loom going in an "over and under" fashion. Remember, you don't want them super tight - just tight enough to bounce back when you press down on the warp threads.


When you get to the end nail, carefully make a tight double knot. 
You can trim the long tail if you want.


Now you are ready to weave! I even found some mini dowels at the Dollar Tree that will fit this loom perfectly :) All you need now is some pretty yarn and a yarn needle.


Feel free to check out my DIY post of weaving here that includes an online class on beginner weaving. 

Enjoy!

xoxo
Ginger

I will be linking up to these awesome parties!

Tuesday, March 28, 2017

Repurposed Coffee Carafe into Terrarium

Hello.

So I know I've been coo coo for terrarium's lately as you remember from here and here. There are so sweet and cute! Plus there is potential to re-purpose items, like here :)


I've had this vintage carafe for a couple of years now. It's been on the back porch and has served many purposes, such as watering can to measuring device to even a seashell display.

It is now being re-purposed again for...you guessed it...a terrarium.

Here's what you need:


vintage carafe
natural decor rocks
moss rocks
Spanish moss
few floral sprigs
faux succulent

As you can probably guess, all of these items were purchased at the Dollar Tree. The carafe was a thrift store purchase.

In the end, I decided on a design that included only the decor rock, moss rock and succulent. But you can play with this and come up with so many designs.

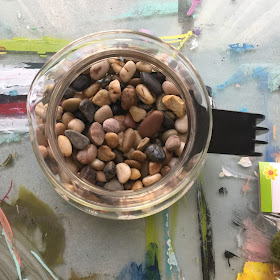
First, I filled the bottom with an even layer of the natural decor rocks.


I then nestled a few moss rocks into the decor rock. Lastly, I added the succulent.


Very simple but turned out lovely :)


I soon hope to be adding a sweet bench and side table on my front porch. I hope to set this little terrarium out as well to pair nicely with my succulent wreath.

Enjoy!

xoxo
Ginger

I will be linking up to these awesome parties!

Monday, March 27, 2017

Support Your Fellow Crafter Linky Party #2

Hello.

Today is Support Your Fellow Crafter Monday - 2nd edition! Some lovely bloggers linked up last week and I'm happy to share some of their projects :)

First up is this super cute burlap bunny garland from Eclectic Red Barn


Then this amazing blueberry pie recipe from This Autoimmune Life


I'm also in love with these up-cycled vintage frames at Sadie Seasongoods

  
And last but certainly not least are these completely adorable zipper pouches 


If you were featured for last weeks Support Your Fellow Crafter, please snag a featured button below!


Grab button for http://superstinkyboys.blogspot.com/
<div class="Support Blog for Moms of BOYS!-button" style="width: 150px; margin: 0 auto;"> <a href="http://superstinkyboys.blogspot.com/" rel="nofollow"> <img src="http://i1043.photobucket.com/albums/b440/gingercochran/IMG_0663_zpsyyxskqa6.jpg" alt="Support Blog for Moms of BOYS!" width="150" height="150" /> </a> </div>

Now lets move on to Support Your Fellow Crafter :)


First the rules of the house:

Please link only to your blog post, not your blog
Please link back to my blog on your post
Please visit and comment on the 3 links before your link
Please do not link your Etsy or other similar site
Please snag the linky party button to the right
Have fun!


Friday, March 24, 2017

Delicious Tuna Salad Recipe

Hello.

I wanted to share a recipe with you today. It's a take on classic tuna salad. Very tasty and a great spring/summer brunch or lunch menu for hanging out with girlfriends.


Ingredients:

2 cans of wild caught white albacore tuna
1 carrot
1/2 granny smith apple
2 tbs of dill pickle relish
1 stalk of celery
1 1/2 tbs of olive oil light mayo
dried oregano
garlic and herb seasoning
sea salt and fresh cracked pepper to taste
whole wheat baguette

First, preheat oven to 425.

Then, dice up the carrot, celery and apple. Set aside.

In a mixing bowl, empty can of tuna and break up the fish a little.

Add the fruit, vegetables and relish and stir well. Then add the mayo and stir until well incorporated.

Add a few dashes of dried oregano and garlic and herb seasoning, as well as fresh cracked pepper and sea salt to taste. Stir well.


Slice the baguette into thin angled pieces and toast for 5-10 minutes.

Scoop salad onto toast and enjoy! I recommend a big glass of sweet tea and lemonade half and half to drink ;)

xoxo
Ginger

DIY Compost Bin

Hello.

Just let me say, I love gardening! Not only is it a great pastime and stress re-leaver, but there are so many environmental and health benefits as well. It is so satisfying watching things grow and having the security of growing my own food. In addition, a great garden, whether it is a vegetable/fruit or flower garden, can create a wonderful backyard habitat that will make you want to stay out all day long :)

Gardening certainly wasn't always easy for me. As a matter of fact my first three years yielded nothing more than a few lettuce leaves here or there. But I would not give up and over the years, I have come to understand what plants work best for my lifestyle and what type of garden works best.

And I've learned many tricks along the way ;) One of the most important would be the compost bin. 


I used to think a compost pile/bin would be  gross! Smelly, full of spoiled/rotting garbage and bugs, etc. But I've come to learn gardening and compost come hand in hand. And as it turns out, none of those fears held water - except maybe rolly polly bugs ;)

Since deciding to compost, I've had several fails. First, I tried a compost pile in one corner of the yard. My first mistake was not using the container method. The wind blew everything everywhere and it did not maintain the proper level of moisture. 

After some no-go container attempts, I've since decided a giant 20" pot is best for me. I like to work in small batches of compost. Obviously if you have a very large garden, you can try the garbage tote system, etc. 


This is my bin. Wide open top for easy "stirring".


Drainage holes in the bottom of the pot are a plus.


And the existing tray in the bottom promotes air flow. Now to start your mixture ;) 

My second fail when starting to compost was improper ratio of compost ingredients. This is the recipe I like to use and I think it works really well :)

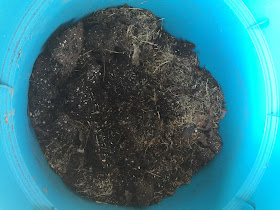
First I start with a dry filler. Here is a separate bin of grass clippings that have dried out. Note I also add a trowel full of fireplace ash to my compost for PH balance. Ash is also good for acid loving plants. But remember a little goes a long way ;)


I fill the bin about a quarter of the way with dry filler. Other dry fillers could include dried fall leaves, straw/hay or bulk dried corn husks - which work great for keeping up compost during fall and winter months.


Then I throw a layer of dirt in there. This could be any dirt - I tend to use the soil left over from the previous years hanging baskets, etc. The dirt will hold water - which we'll add later.


Then add a layer of "green" filler or "wet" filler. Bulk green fillers could be fresh grass clippings or a bucket of weeds you've pulled. 

In addition, I love to throw in organic kitchen waste: egg shells, coffee grounds, vegetable and fruit waste and/or peels, even animal blood!

There are also several everyday home products you can find biodegradable versions of, such as toilet paper, paper towels, feminine products - even tooth brushes. But for now I'm sticking with the basics.


Then I add another light layer of dry filler. I then will add a little water to the mix. I have a fish pond so I generally will grab a cup or so of pond water, which will be full of nitrates.

You can always mix plant food with water and add or just stick to plain water altogether. 


Then mix well with a trowel or shovel and let sit to work its magic. I generally will turn the mixture once a week or so. If it has been very hot I'll add a little more water and mix more often to evenly distribute moisture. 

I add a layer of compost while planting new crops in my beds as well as a thin layer to potted plants. So start gardening!

Enjoy.

xoxo
Ginger

I'm linking up to these awesome parties!