Showing posts with label thrifted. Show all posts

Wednesday, May 17, 2017

Quick DIY Succulent Mother's Gift

Hello.

For my sweet mother in law (who is one of the sweetest people I have ever met - I am truly fortunate) I wanted an especially sweet Mother's Day gift.

I had found this super cute rooster coffee mug from a local thrift store that perfectly with her decor, a few months ago, and I had planned on making a candle for her - but alas, I could not find my candles making supplies!!! What? Yeah, I must be that dis-organized...

Oh well...

I decided on succulent instead :) A good friend of mine has been creating some super cute arrangements lately and I figured....PERFECT!

I snagged an beautiful aloe plant from Walmart for about $5 and score....perfect for the mug I had on hand. No soil required ;) How about that??


This was really THE perfect fit :) It will go great with her kitchen decor and she loves to garden ;)


I added a sweet little bow and hand made card using my new packing image transfer technique :)


She loved it and I was more than proud to present her with this gift. She provided me with a beautiful man and father for my children :)  She s worth so much more!

Enjoy!

xoxo
Ginger

I will be linking to these awesome linky parties!


Thursday, April 13, 2017

Art Journaling from a Thrifted Book

Hello.

So I came across a lovely online art journaling class that included a thrifted book! I was so intrigued!

The idea is that the book already contains text, imagery, binding and a hard cover...sounds like my kind of project for sure ;) I immediately went to my book shelve as I knew I had the perfect book to start out on my newest creative journal :)

As luck would have it, I had purchased this vintage indoor gardening book months ago. I saw it and was just drawn to it. I'm glad I didn't disregard it as a frivolous purchase :)

It has some beautiful imagery - not to mention that old book smell. It's perfect!


It had a dust jacket cover, but I decided to omit that from the journal itself and use this paper for collage purposes later on.


So now I have a beautiful hard-bound book to work with.


Next using regular craft paint, from Walmart or Michael's, I added some color to the pages of the thrifted book.


I also collaged several magazine pieces and various paper materiel onto the pages. Whatever struck my artistic fancy!


Materials used were:

magazine pictures
dust jacket material
brochures clippings
craft paint
oil pastel
markers
colored paper

I also used various items to create a painted pattern, such as bubble wrap or the eraser end of a pencil.

I also enjoyed cutting out letters from magazines to create text in a random note style.

I used several paper sources for collage material, to include:

Past plane tickets
mailers
packing materials
washi tape


I am particularly drawn to SKU numbers and bar-codes :)


So much at your finger tips! Any paper material can be recycled to create art in your art journal. I hope to see what you all journal about and create!

Enjoy.

xoxo
Ging

I will be linking to these awesome parties!


Tuesday, March 28, 2017

Repurposed Coffee Carafe into Terrarium

Hello.

So I know I've been coo coo for terrarium's lately as you remember from here and here. There are so sweet and cute! Plus there is potential to re-purpose items, like here :)


I've had this vintage carafe for a couple of years now. It's been on the back porch and has served many purposes, such as watering can to measuring device to even a seashell display.

It is now being re-purposed again for...you guessed it...a terrarium.

Here's what you need:


vintage carafe
natural decor rocks
moss rocks
Spanish moss
few floral sprigs
faux succulent

As you can probably guess, all of these items were purchased at the Dollar Tree. The carafe was a thrift store purchase.

In the end, I decided on a design that included only the decor rock, moss rock and succulent. But you can play with this and come up with so many designs.

First, I filled the bottom with an even layer of the natural decor rocks.


I then nestled a few moss rocks into the decor rock. Lastly, I added the succulent.


Very simple but turned out lovely :)


I soon hope to be adding a sweet bench and side table on my front porch. I hope to set this little terrarium out as well to pair nicely with my succulent wreath.

Enjoy!

xoxo
Ginger

I will be linking up to these awesome parties!

Tuesday, March 14, 2017

Vintage Cheese Cloche Dome

Hello.

I absolutely love thrifting and got a chance to do some thrifting with my mom last weekend :)

And I happened upon a super sweet vintage cheese cloche for only $6.99. I cleaned it up and added something other than cheese. ;)


I added a coral skeleton from my honeymoon, a wasp comb from a family hike and a faux succulent. Such a charming way to display little treasures!


Stay tuned for more thrifted finds!
Enjoy.

xoxo
Ginger

I will be linking to these awesome parties!

Tuesday, March 7, 2017

DIY Candle Making

Hello.

In keeping with this candle theme this week, I wanted to share a DIY candle making tutorial. This is super fun and easy to do. I used to kinda be intimidated by candle making but it truly is not.

As you know, I am a very frugal person. I want pretty decor candles in my home, but I don't want to spend a ton of money.

I tried just shopping for candles only at Walmart or The Dollar Tree, where the price is right, but they are boring.

I finally had the light bulb moment, knowing that if I learned candle making I could literally make a candle out of any sensible vessel. As long as it sits firmly level and is not flammable, you can make it into a candle ;)

Today, I made this lovely yellow candle ;) and I absolutely loved how it turned out.


Its always fun to come across cute vintage mugs, or small pots signed by the artist!


And come Christmas time, I make several gifts from thrifted vintage Christmas mugs :)


Here is what you need:

a vintage mug - I used this cute retro 80's one
couple of empty metal cans - I used a smaller cat food can for the color wax
crayons
popsicle stick
essential oil
metal tongs


Start by removing the paper from the crayons. I chose yellow to compliment the black design on the mug. 

To remove them easier, carefully cut a knife to cut and peel, like you would an orange.


Then pour the soy wax into the mug and pack it down to measure how much you'll need to start off with. Then pour it into the larger can. Then fill your mug again with wax about half full and set aside.


The measure your wick adding about 2 extra inches. String the wick through the anchor and cut. Secure the anchor to the bottom of the mug with a little pre-melted wax so it doesn't move around.


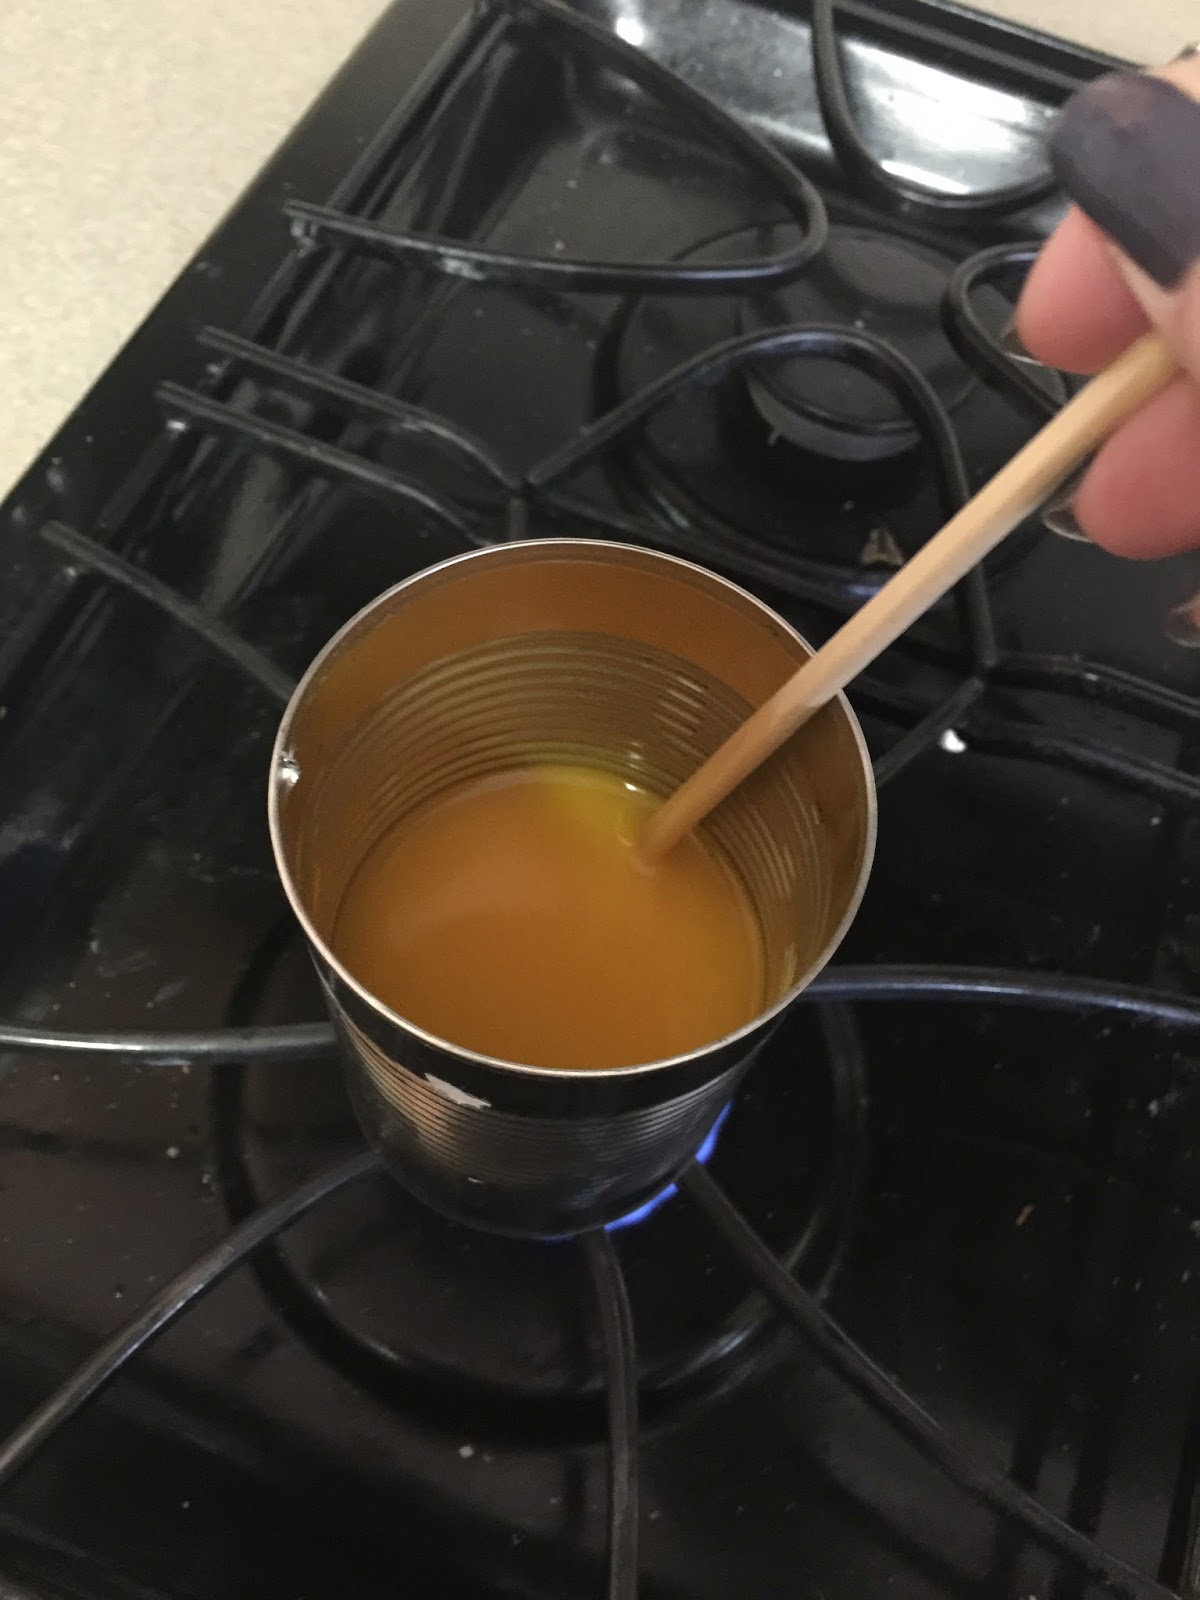
Then place the can of wax onto the stove to melt over low heat as you stir with popsicle stick. As it melts, add the remaining wax you set aside. Then add about 10 drops of your essential oil.


I chose Nature's Truth Thrive Essential oil from Walgreen's Pharmacy. Lovely invigorating scent :)


At this time, melt the crayons in the smaller can. I wasn't paying attention and poured into the big can with the plain wax. It's better to melt each color in separate cans so residual wax colors don't show up in future candles.

Stir well.


Then using the tongs, very carefully pour the hot, melted wax into the mug, stopping about a quarter inch from the top. Seriously. It is lava hot. Be careful. 

Place the stick under the wick to keep it centered. Carefully move the candle where it won't get bumped and let set for 2 hours.


Then trim the wick, light and enjoy!


Now that you can make your own candle, you can refill your pretty decorative candles over and over when they burn down.


Enjoy.

xoxo
Ginger

Linking to these parties.

Monday, March 6, 2017

In Love with Florals

Hello.

In decorating, every designer has their little tricks for pops of color. Could be pillows, throw blankets, art, etc. Even rugs.

And yes - I use all of the above :)

But I also really enjoys pretty flowers. What better way to add some natural-looking beauty in your home that a lovely vase filled with flowers that never die?!

But being very frugal, I want to pack a color punch without spending a lot of money. Enter the Dollar Tree.


Here is a selection I have in my house - and these are not even all of them. You can see my sweet little DIY Succulent Pot front and center :)

There are several approaches for floral arrangement color schemes but I really appreciate pinks and greens. They are very eye-catching from across a room.

All of these arrangements were made with Dollar Tree floral stems. Most of these are thrift store or gifted vases.


This is my most recent addition. I found this awesome, geo-style, vintage vase at a thrift store for $6. It was a little more than I usually would pay for a vase but I had to have it. I am constantly on the look out for vases and jars to put flowers in.

I added black river rock from DT (Dollar Tree) and some pretty pink, peach and green flowers.


This vase was gifted to me by my mother on Valentines Day a few years ago. I loved the bold pattern and thought smaller blooms would look really cool.


This was an easy DIY project. I bought a small glass jar, stems and decor rock from DT. 
I applied contact paper along the bottom in a pattern, applied frosting spray, let dry and then added decor rock and stems.


You can add height and draw eyes up with tall arrangements. A single, bright yellow DT stem in a tall blue bottle adds height next to my Beethoven bust :)


Speaking of busts, I found this adorable vintage flower holder at a thrift store. It even still had the foam in it. Added a few stems and too cute.

Post a comment with your floral projects!

Enjoy.

xoxo
Ginger
Related Posts with Thumbnails