Showing posts with label painting. Show all posts

Tuesday, May 16, 2017

Packing Tape Image Transfers

Hello.

So I recently cane across an online class that taught several different modes of image transfer!

I used to think that image transfer was a lengthy and pricey process, requiring several ingredients that I did not already have on hand.

However, that is not the case! I was very exited to learn I can make some gorgeous and very detailed image transfers using only clear packing tape!!!

Now this works best with laser print printers and magazine cut outs. Ink jet printers may present a problem ;)

So I stuck with the two recommended types. And I will tell you.... this process captures color BEAUTIFULLY!  And it is so easy :) you'll be dying to try this DIY project!

Here is what you need to get started:


I started with a palette smash little canvass but paper works well too ;)
clear packing tape
an image (magazine or ink jet printer)
bone folder or spoon or anything really to brazen the image (not pictured)
scissors (not pictured)
bowl of warm water (not pictured)
glue stick

This process is so incredibly fun and easy, you'll be adding to all your journaling and collage projects!

First, select an image. I chose to print a black and white image from the web. Again, magazines work really well for this project.

Place and adhere a strip of clear packing tape over the image.


Burnish well with a spoon or bone folder. In this case, I used a sharpie cap. Worked just fine ;)


This will really work the ink into the tape and ensure a solid image transfer.


I couldn't get pictures of this next step, but place the tape-covered image in the bowl of warm water and gently rub the paper away with you thumbs. It sluffs off easily and you should have no trouble in this step. What you'll have left is the piece pf tape with the image - clear as day :)


Once dry, the tape will still be somewhat sticky, but adhering with the glue stick (or adding a layer on Modge Podge) will keep your transfer in place :)


This process works very well with black and white images as well as color! I had no trouble filling this small practice canvass :) You'll see I made an additional transfer of a magazine page with a water pattern on it :)

I added a sweet little "XOXO" ink stamp and called it done ;)


Enjoy!

xoxo
Ginger

I will be linking to these awesome parties!!

Monday, May 8, 2017

Trip to The Hamptons, New York

Hello.

So I had a company retreat not too long ago! One of the more pleasant reasons I haven't posted as much as I'd like :) Another pleasant reason is my recent trip to Los Angeles; post coming soon ;)

Such a beautiful place with some of the most lovely homes! And the BEACH! Just gorgeous:)

Here's what I was up to while way up north! 
Gazing at dreamy homes right off the beach.


Munching on yummy food and wine while tossing across ideas!


See my journal in the bottom left? It says whistle while you work! LOL


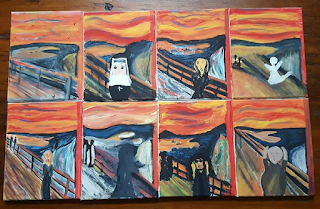
I even hosting a "Paint and Sip" team building exercise. I guided my colleagues in a recreation of Edvard Munch's "The Scream". Guess which is mine?


Oh I'm silly like this..LOL! Decided a Pop Doll nun was much more fun ;)

A quick exertion to the beach took place, where I lifted some sea rocks and gorgeous sea shells for my already massive collection! These are just a few ;)


I got searched at security due to the suspicious objects showing up on X-ray. 
Knock yourself out security man! I'm just the chick that collects sea shells.

Enjoy!

Xoxo
Ginger


Monday, May 1, 2017

Mixed Media Painting with Bold Colors

Hello.

Yes I'm sure some of my few readers might have noticed my absence this past week. Well I'll tell ya, it has one heck of a week to say the least!

In addition to my Dallas art show, I also had a company retreat to The Hamptons in New York, wisdom teeth removal surgery, and then off to Los Angeles to assist with another show :)


Aside from the surgery, which totally and completely sucked, I got in some cool traveling, which I'll tell you all about in future posts...so stay tuned!

Today, I wanted to share a new painting that I think I have finally finished. Like pretty much every mixed media painting I do, I complete it in stages. This pretty thing has been sitting in the studio for about 3 months.


I decided to use some very stark, bold colors in this painting, like black, red and teal. I then brought in softer colors, even pastels, to calm the boldness a little without losing that "demanding" look I wanted.

I also played a little more with mixed media in this piece. In addition to marker, ink pen, pencil and oil pastel, I brought in slivers of reflective duct tape as seen here.


Also, I am in love with the effect of white ink pen on black paint, so I was excited to use that technique here.


I love using various organic shapes within my pieces; scallop or "U" shapes, continuing circles, as well as shapes that resemble a cell or something one might see under a microscope.

I've also started experimenting with pin wheel shapes and continuing triangles.


It's really satisfying to see how one mark, shape, line or color can interpret the direction of a painting. I hope you enjoy making art yourselves! And perhaps comment with a picture of your own!

xoxo
Ginger

I will be linking to these awesome parties!

Tuesday, April 18, 2017

Dollar Tree Haul!

Hello.

Well, we all know I am a big fan of the Dollar Tree...well maybe if I have one or two readers out there LOL. Are you out there??

Joking aside, I love the Dollar Tree because it provides economical ways for me to explore my mixed media tendencies and come up with more fun ways to create entries in my creative journals.

Let take a look at what I scored:


The first thing I was excited to see in the Crafts section was some decorative/craft papers pads. I tend to do a lot of collage work in my journals, so I picked up several of these.


Lovely patterns :)

I also was happy to see some stamping sets! Even an acrylic block!


I def can't wait to try these out ;)

I also found some new washi tape that you can color in yourself! It's a cool wave pattern; it will look great in my journals and perhaps new mixed media art work pieces :)


And since I am so big on creative journaling at the moment, I was excited to find these Coloring Journals. Beautiful designs and pages to write poems, thoughts, etc.


I snagged some rad neon colored gel pens too to start out some great journaling pages!


Lastly I snagged some fun patterned binder clips for my journals :)


Strips are always in style in my book ;)

Enjoy!

xoxo
Ginger

Thursday, April 13, 2017

Art Journaling from a Thrifted Book

Hello.

So I came across a lovely online art journaling class that included a thrifted book! I was so intrigued!

The idea is that the book already contains text, imagery, binding and a hard cover...sounds like my kind of project for sure ;) I immediately went to my book shelve as I knew I had the perfect book to start out on my newest creative journal :)

As luck would have it, I had purchased this vintage indoor gardening book months ago. I saw it and was just drawn to it. I'm glad I didn't disregard it as a frivolous purchase :)

It has some beautiful imagery - not to mention that old book smell. It's perfect!


It had a dust jacket cover, but I decided to omit that from the journal itself and use this paper for collage purposes later on.


So now I have a beautiful hard-bound book to work with.


Next using regular craft paint, from Walmart or Michael's, I added some color to the pages of the thrifted book.


I also collaged several magazine pieces and various paper materiel onto the pages. Whatever struck my artistic fancy!


Materials used were:

magazine pictures
dust jacket material
brochures clippings
craft paint
oil pastel
markers
colored paper

I also used various items to create a painted pattern, such as bubble wrap or the eraser end of a pencil.

I also enjoyed cutting out letters from magazines to create text in a random note style.

I used several paper sources for collage material, to include:

Past plane tickets
mailers
packing materials
washi tape


I am particularly drawn to SKU numbers and bar-codes :)


So much at your finger tips! Any paper material can be recycled to create art in your art journal. I hope to see what you all journal about and create!

Enjoy.

xoxo
Ging

I will be linking to these awesome parties!


Tuesday, April 4, 2017

Newest Mixed Media Painting

Hello.

I started art journaling several months ago...only I was not sure I was art journaling at that time :) lol! What I mean is, I was keeping busy with creative doodling to try and prevent artist block. And it turned into one of my preferred creative practices :)

During this time, I was experimenting with different medium - exploring how one color of one medium pairs with another of the same color. Different textures and shapes. I realized it was a lot of fun and the process was really inspiring.

Essentially I discovered - by accident - the abstract style that I now singularly pursue. I feel it is original work, true to my artistic nature and true to my personality.

Here is a painting I had started months ago. I started and stopped adding to it on several occasions - thinking more and more about what direction the painting was taking.


I'm still not sure if it is complete at this time, but I wanted to share it :)

Medium includes:

acrylic paint
oil pastel
crayon
#2 pencil
charcoal pencil
marker
ink pen
ink stamp

I hope you enjoy!

xoxo
Ginger

Thursday, March 30, 2017

DIY Artist Mat with Poster Board

Hello.

Just wanting to connect with the artists out there! I'm a mixed media artist myself and have participated in many group shows as well as had several solo shows. Here are some little paintings I completed while art journaling.


And all that work needs to be presented perfectly - hence a chic white artist mat to frame artwork. I prefer white as it makes every other color pop against it. It is a also a very classic look ;) With all this art work, I am a big fan of pre-cut mats. I generally order them from Amazon with the backer and plastic sleeve - very economical and easy!

However, they come in very common sizes and art isn't always a common size. So for little paintings on paper, I generally do a quick art mat from poster board with a card board backer. Really easy and every thing you need can be found at the Dollar Tree.

Here is what you'll need:

card board (preferably white)
white poster board sheets
ruler
utility knife
masking tape
paper cutter (or scissors)
pencil


Quick tip: I bought the package of 5 white poster board sheets as well as the white card board at the Dollar Tree in the school supply section.

First, I placed my art on the cardboard piece and gauged how large I wanted my final matted piece. I then measured 2 inches in. I then measured two inches from all sides.


Then cut the card board square and this will be our backer board.


Then lay the backer on the poster board and trace the edge.


Using the paper cutter or scissors, cut the poster board to size.


Now you have two matching sized pieces.


Set aside the backer and lets focus on the mat. Using your art as a guide, measure where the window will go.


I chose 2 1/4 inches in on all sides. Using the utility knife, carefully cut out the window.


Then using the masking tape, attach the art into the window of the mat.


Sandwich the matted art and backer together and frame. 
Or use plastic art sleeves or bags, as I have done here.


All done!
Enjoy!

xoxo
Ginger

I will be linking to these awesome parties!
Related Posts with Thumbnails