Showing posts with label sewing. Show all posts

Tuesday, February 28, 2017

DIY Loom

Hello.

I am a big believer in you never stop learning. I love learning new skills. Particularly arts and crafts skills. And I recently started crocheting again - which got me interested in weaving.

I saw this incredible DIY loom here and decided to give it a go. I strongly suggest you check it out, along with the hundreds of other ideas and classes this website has to offer.

Back to the project. If you are a regular artist or crafter, you likely have most of the materials needed to make this loom and weave your first tapestry already. I actually only had to purchase a needle and a dowel. The rest of the materials I had on hand.

I will say I had a few colors of left over yarns from previous projects, but did that stop me from buying some new, gorgeous colors? No it didn't.


Anyways, today I spent about thirty minutes building and preparing my loom and then got to work :)


Once I started the fringe, I moved to my easel ;)

I think this is a good stopping point for today. I'm really looking forward to learning more techniques for weaving and incorporating more wall art like this into my house.

Enjoy.

xoxo
Ging


Friday, February 4, 2011

Thomas PJ Pants

Yeah!  My first attempt at making clothing for the kids.  

I found this super cute Thomas the Train flannel in the remnant bin at Hobby Lobby...I immediately knew I wanted to try making a pair of PJ pants for Jackie!

Not too bad for a first try.


He loves em!!

Ginger
SSB

I'm linking to these great parties!

Tuesday, January 25, 2011

Dress Rescue Part No. 2

So you saw my first dress rescue...I have one more...but it was a little trickier.

And I loved how it turned out!
The white ruffled part was already on there, but again...this dress had a REALLY low neckline.
(about an inch of my bra cup was showing on each side!!  And I wasn't gonna post a pic of it.)

But I couldn't rescue this one like my other three dresses.  Hmmm...what to do?
I decided to alter the sleeves and pull it in about an inch in the shoulders to bring up the front.

By turning the dress inside out, I pinched the back and front necklines together and stitched a new shoulder seam (starting an inch down...tapering up to the corner seam for the shoulder).

The result is full coverage in the front :) and...a cute little capped sleeve!

There were belt loops on the sides...but no belt.  No biggie...I had one that would work and with my altering, the waist line was shifted anyways.  I snipped em off and here is the new waist line with a smart black belt.
Yippee!  I'm wearing it to work tomorrow!

Ginger
SSB

I'm linking to these great parties!

Table Runner for Mom!

So I loved my new table runner so much that I decided to make my mom one too.  I saw this too cute BBQ theme fabric in white, red, and black in the remnant bin for $3!  

Perfect!  My moms kitchen is decorated in those colors!  I snagged some coordinating colors is fun patterns and...
Ta-da!

I made moms a square shape.
Here's a bit of a close up...
Hope she loves it!
Enjoy!

Ginger
SSB

I'm linking to these great parties!

Wednesday, January 19, 2011

Scrap Quilted Table Runner

I was off on Monday, so I finally had the time to make this runner I first saw here and then here.
I knew I wanted to make one and this is a GREAT scrap buster!

Best of all...my husband actually likes it!!  Hehe!
He even thinks I should add some color like this to other areas of the house.
Hmmmm.....

Got to use a lot of scrap fabric that I love and haven't been able to part with.  In fact, just before seeing this project, I had gone thru and thrown out a bunch of stuff I could have used :( on this one.  
This'll teach me...

Can't wait to make my mom one!
And  my SIL, and my MIL, and my friends...

Ginger

Saturday, January 15, 2011

Thrift Store Dresses Rescued

So I went thrifting with my mother the other day and snagged three beautiful dresses!
Great price, great colors, fabric and the cuts fit me perfectly!


The only draw back was that all three of them had incredibly PLUNGING necklines.
And I'm pretty modest, so I came up with a quick way to rescue these dresses.
I've actually seen this in a few places like here.

So, I took an old shirt that doesn't fit well and that I'll never wear again and cut a few triangles shapes out of it.

I gauged the size based on the neckline of the dress.  Just eyeball it, and go a little bigger because you can always trim excess off.


I sewed the triangle into the neckline with coordinating thread and there you go.

Ohhh...I LOVE these dresses now.  Perfect fit and now appropriate for work and church.
Great for out and about with family or out to a nice dinner!  Enjoy!

Ginger

Monday, December 20, 2010

Garbage Catcher Tutorial

So I made some cute garbage catchers for the car for all the ladies in the family...
and here is the promised new and improved tut!  

 
The best thing about this project is that you can use up a bunch of scrap...I only bought fabric for one bag because my mom is picky because my mom requested a certain color scheme.

You will need:
(4) 7.5 x 11 pieces of fabric (2 for the main fabric and 2 for the liner)
(1) 7 x 3 piece of fabric for the loop
thread, scissors, iron, sewing machine, etc.

Step 1:  cut out your 4 main pieces and the loop piece

Step 2:  tri-fold and iron the loop piece long ways, then sew right down the middle with a zig zag

Step 3:  sew your 2 main pieces (right sides together) in a basic bag form

Step 4:  sew you liner pieces (right sides together) in a basic bag form with a hole in the bottom to turn inside out

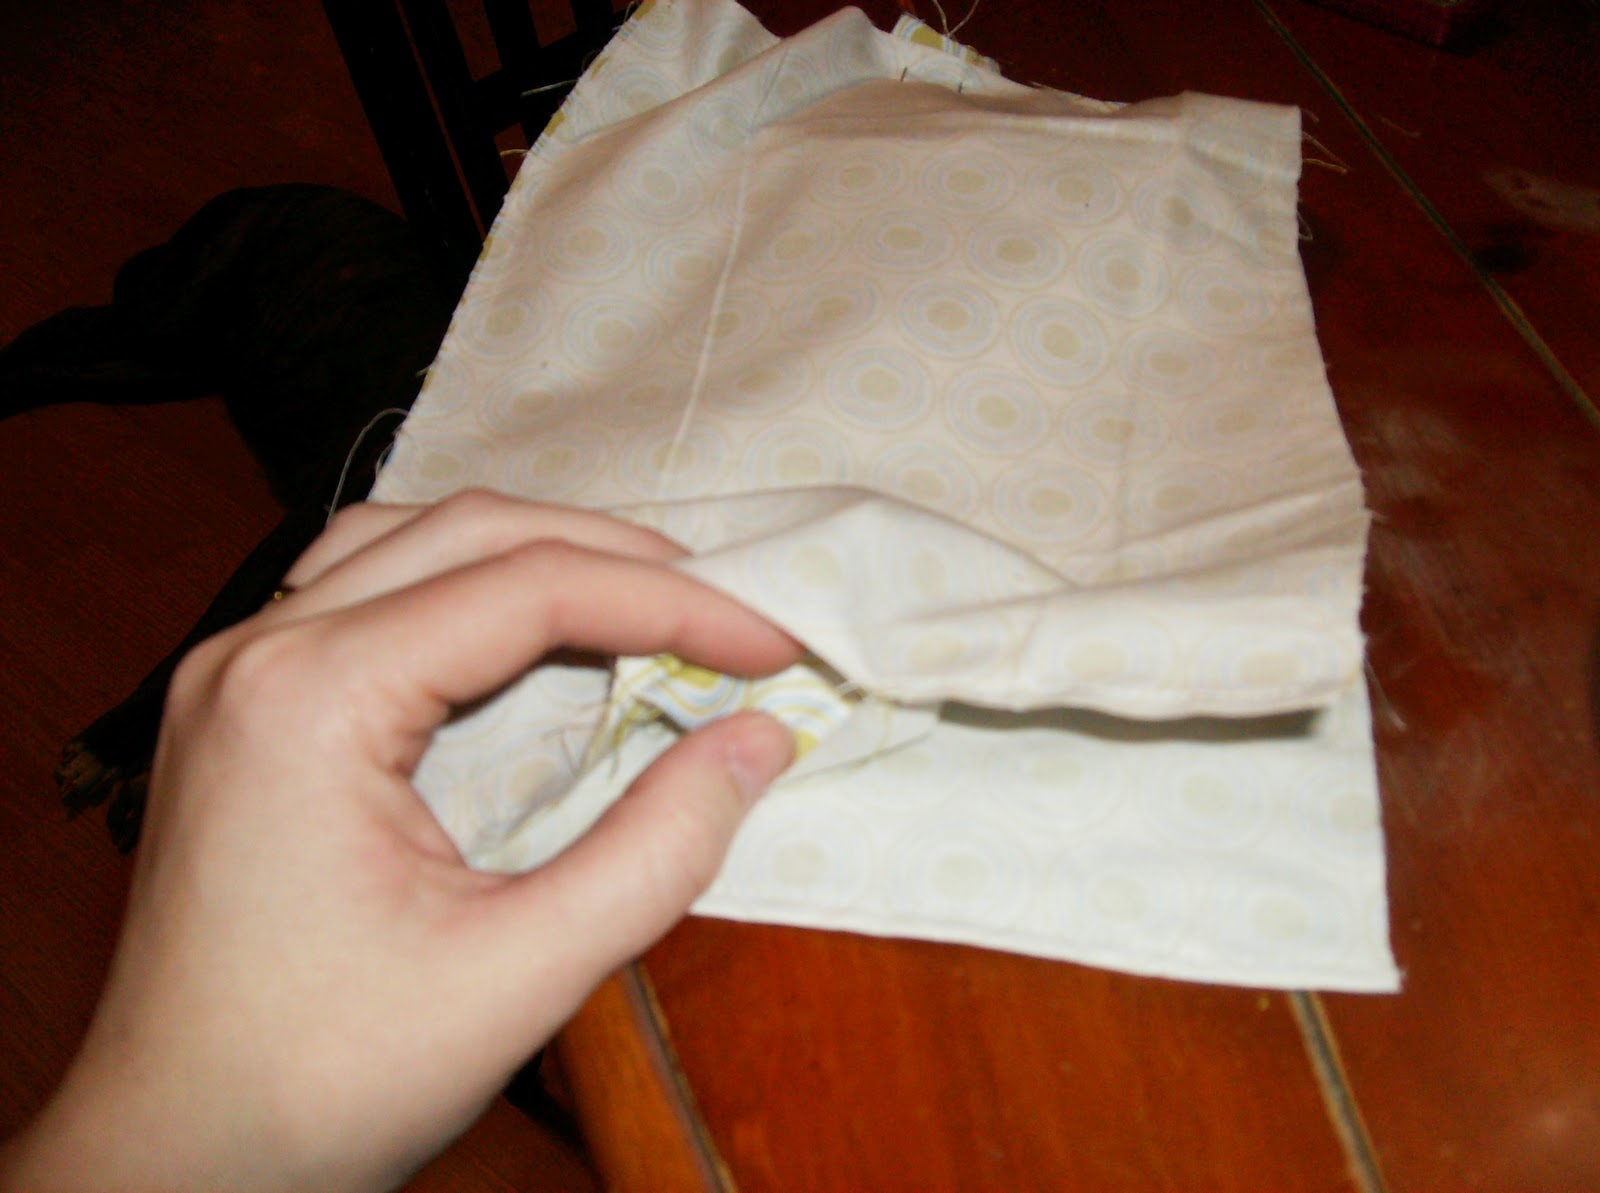
Step 5:  now it can get a little tricky...lay the completed piece (outside fabric) down on the table and lay the piece with the hole (liner fabric) right on top.  So counting the "sheets" of fabric, there will be 4 on top of one another (the bottom 2 sewn together and the top 2 sewn together).
Pinch the VERY BOTTOM sheet and the VERY TOP sheet together and fold the 2 middle pieces down inside so you will not catch them in the sewing machine.  

Step 6:  Fold the loop in half and place IN BETWEEN your pinched layers with the TRI-FOLD SEAM FACING DOWN.  Pin in place.
(so to re-cap, loop seam facing down pinned between the top and bottom layers...the middle layers smooshed down so as not to catch them in the sewing machine)

Step 7:  Sew the fabric all the way around; double up around the loop for extra support.

Step 8:  After sewing, it should look like this.

Step 9: Then, turn right side out thru the little hole we left in the liner.
Now it look like this...much like a pillow case.

Step 10:  Sew the little hole closed.

Step 11:  Then stuff the liner part into the main part.

Step 12:  Iron the bag flat a little and top stitch around the opening.

Step 13:  Reinforce the sides about an inch down for extra support...and this helps the bag to not "gape" open when hanging in the car.

All done!  
And quick too...it only took me about 20 minutes to make!

And a quick way to present it to a friend...
I took a regular sticky Christmas name tag and stuck it on some card stock.  Roll up the bag, punch a hole in the card stock and tie with a ribbon!

Enjoy!
Ginger
SSB

I'm linking:

Craftastic Monday at Sew Can Do
Tot Tuesday at My Delicious Ambiguity
Creative Juice Tuesdays at These Creative Juices
Fingerprints on the Fridge 
Keeping It Simple
The Trendy Treehouse

Friday, December 17, 2010

More Garbage Catchers for Christmas Gifts

I made a few more for some girlfriends as Christmas gifts and I think they turned out pretty darn cute!

I snagged this cute paisley fabric out of the remnant bin at Hobby Lobby and loved it!

I didn't include a liner in my first design and though it did the job of "catching garbage" it was kinda flimsy and I didn't like seeing the raw side of the main fabric inside.

I used a pretty coordinating fabric and made liners for these...
They are now a lot stronger and can withstand all the "garbage catching"...
...plus they're cuter!

I plan on making a heap of these for family and friends this year!  I think I may come up with an updated tutorial too, so check back for that.

Ginger
SSB

I'm linking:

Show Off Your Stuff at Fireflies and Jellybeans
Hooked Up at House of Hepworths
Feature Yourself Friday at Fingerprints on the Fridge
Plant a Seed at Punkin Seed Productions

Tuesday, December 14, 2010

Quick Little Holiday Bags

I snagged some cute Christmas fabrics from the remnant bin at Hobby Lobby the other day.  Aren't they cute!


And I decided to make some cute little over night/toy bags for the kids!
 Just a simple pattern with a lining.


Jack loves his!  

Ginger
SSB

I'm linking:

Craftastic Mondays at Sew Can Do
Creative Juice Tuesdays at These Creative Juices
Wed Did It Wednesday at Sew Much Ado
Show and Tell at Blue Cricket Design
Show Off Your Stuff at Fireflies and Jellybeans
Hooked Up at House of Hepworths
Feature Yourself Friday at Fingerprints on the Fridge
Plant a Seed at Punkin Seed Productions

Monday, November 22, 2010

Eezy Peezy Garbage Catcher for the Car

So, I went and had my car cleaned out because me and my husband are lazy and detailed and after filling a Walmart sack full of trash (wrappers, Kleenex, straw wrappers, etc...don't judge), I decided something needed to be done.

I actually have been meaning to make one of these forever...I first saw them at Fireflies and Jellybeans.  Anyhoo...I thought, "I can do that."
What do you think?

1.  All I did was take a square piece of fabric (make any size you need) and folded it in half.  

2.  Then I cut and measured a coordinating fabric to make a border around the top.  

3.  Then take a piece of fabric (big enough to loop around a knob or whatever in your car) for the loop and tri-fold it.  Then sew right down the middle of the fold to secure it.

4.  I folded the edges of my border piece a little and ironed it still.

5.  I pinned the border to the main piece with the loop in between and sewed all the way around.

6.  Then I boxed the bottom corners and turned right side out.

7.    Lastly, I top-stitched the sides of the border portion for a little strength.

I think I'll make one of these for all the girls in the family for Christmas.  Who couldn't use one!?
Makes a quick gift!  I'll make a tut soon for one with a lining!

Ginger
SSB

I'm linking:

The Girl Creative Party Blog
Motivate Me Monday at Keeping It Simple
Craftastic Monday at Sew Can Do
Tot Tues days at Delicious Ambiguity
Creative Juice Tuesdays at These Creative Juices
Show and Tell at Blue Cricket Design
Hoo's Got Talent at Night Owl Crafting
We Did It Wednesday at Sew Much Ado

Thursday, September 23, 2010

Vroom Vroom Washable Placemats

So at dinner the other night I had an idea.  I'm sick of cleaning up the table a hundred times during meals because Jack is rather messy sometimes.

We tried using plastic place mats but they were too big to store conveniently and they melt in the dish washer...what to do?  Well, I had some cool race car fabric that I've been wanting to use.


Ta da! 
A machine washable place mat...just shake it out and toss it in the washer.
No wiping or scrubbing clean.

Super easy...
Step 1: Just cut two equal size rectangles of coordinating fabric.
Step 2: Sew right sides together leaving a hole to turn right side out.
Step 3: Iron flat and sew up the hole.
Step 4: Top stitch with a zig zag or any other decorative stitch.

Want it water proof?
Add a layer of a water proof material such as an old mattress cover!  Works like a charm!

Also makes a quick gift...get you some cute character plates from the $1 store and sew a few washable place mats in matching fabric!!

Here is Jack enjoying his new place mat.
What a goof!

Ginger
SSB

I'm linking:

Craftastic Monday at Sew Can Do
Motivate Me Monday at Keeping It Simple
Marketing Mondays at The Trendy Treehouse
Just Something I Whipped Up at The Girl Creative Party Blog
Anything Related Tuesdays at All Thingz Related
Tot Tuesdays at Delicious Ambiguity
Show and Tell at Blue Cricket Design
We Did It Wednesday at Sew Much Ado
Show Off Your Stuff at Fireflies and Jelly Beans
Feature Yourself Friday at Fingerprints on the Fridge
Plant a Seed Friday at Punkin Seed Productions
Hodge Podge Friday at Its a Hodge Podge Life

Tuesday, September 7, 2010

Simple Garage Sale Dress Re-do

So we had a big garage sale at my folks house this weekend...and of course, I just had to sift thru my moms clothing items.

And found this...
(My husband was kind enough to cut off my head.  Nice, huh?)
Simple little floral print and it fit really nice up top in the bust area!
But the skirt was long and out-dated, so...

I shortened it with a simple hem and kept it right below my knee.
The perfect length for me.

Tomorrow, I'll pair it with a cream cardigan and a pair of sandals and off to work!

Ginger
SSB

Monday, August 30, 2010

Hoo Hoo loves you baby?

So I've seen so many of the cute little owls everywhere and I decided to try my hand at one.
Perfect reason to make one?  My sweet little niece who loves coming to her Aunt Gigi's house!

Isn't she sweet?
I had some white minky left over from an order and the cutest pale pink paisley fabric!
I thought that would be perfect!

I also had some matching stripped fabric for the eyes and nose and did my first try at applique!
I appliqued everything to the minky, sewed the button eyes on, sewed and stuffed...
...and that's all she wrote.

So stink'n cute!  And soft...I know she'll love it!

Ginger
SSB

I'm linking:

Marketing Monday at Trendy Treehouse
Craftastic Monday at Sew Can Do
Just Something I Whipped Up at The Girl Creative Party Blog
Tot Tuesdays at Delicious Ambiguity
Anything Related at All Thingz Related
Messy Monday at The Pumpkin Patch 
Hoo's Got Talent at Night Owl Crafting
We Did It Wednesday at Sew Much Ado
Show and Tell at Blue Cricket Design
Show off Your Stuff at Fireflies and Jellybeans
Strut Your Stuff at Somewhat Simple
Get your Craft On at Life as Lori
Plant a Seed Friday at Punkin Seed Productions
Feature Yourself Friday at Fingerprints on the Fridge
Crafty Friday at Home Sweet Farm

Keeping It Simple

Friday, August 27, 2010

The Wheels on the Bus go Round and Round!

So I loved my Firetruck so much that I just couldn't stop there...
I give you The School Bus!
Jack saw me making it and was so interested, so I decided to let him keep it!

So very easy, the same basic method as the Firetruck.  But I went ahead and made a tutorial with actual pics and a pattern, if needed, for the School Bus.

If you want the pattern, email me because my computer is being dumb and won't upload the pics.
What you need:
coordinating yellow fabrics
black/white fabrics for the wheels
red fabric scrap for the front
sewing machine, scissors, thread, etc.

First, cut out the pattern.  Lay it out on your main fabric (right sides together) and cut.

Make sure you have a baby toddling around your feet the entire time you sew this pillow!

Cut out a few strips of your other yellow fabric 2" wide as long as you need.  Don't make my mistake of only cutting 2 and finding I had to add a 3rd and by then, couldn't get a measurement to give you...oops.

Next, cut out all your pieces to add to the front of your school bus and lay out the design.
Then sew it all down.
I used black felt for the windows, scrap black polka for the wheels with white felt in the middle, red felt for the stop sign, and scrap red fabric for the reflecting line thingy...not sure what that's called but our buses around town have 'em.

I used a zig zag for most of the stitching cuz I love the look.

Then, sew the 2" strips together (right sides facing) to "belt " around the pillow.  Again, I ended up cutting a 3rd strip so I don't have an accurate measurement for ya.  I would say at least 26" long...then you could just cut of the access.

Then, pin the "belt" around the bus giving a little extra slack around the corners.  Then sew one side into place.
It gets a little tricky but not too bad...I found that I would manually turn the wheel around the tight areas so I didn't accidentally stitch out of place.  Then pin and sew the other side.  Leave a hole to turn inside out.


Stuff and whip stitch the hole closed.
All done!  The cutest little pillow on the block!


Jack won't put it down!

Ginger
SSB

I'm linking:

Motivate Me Monday at Keeping It Simple
Marketing Mondays at The Trendy Treehouse
Craftastic Mondays at Sew Can Do
Tot Tuesdays at Delicious Ambiguity
Anything Related Tuesday at All Thingz Related
Messy Monday at The Pumpkin Patch 
Show Off Your Stuff at Fireflies and Jellybeans
We Did It Wednesday at Sew Much Ado
Hoo's Got Talent at Night Owl Crafting
Show and Tell at Blue Cricket Design


Related Posts with Thumbnails